Introduction
This is the training workbook for the postcard workshop at RustNL 2024.
At the moment, only the Setup Instructions are published. The rest of the material will be published shortly before the workshop begins.
If you have any issues or questions, please email contact@onevariable.com
Setup
Prior to the workshop, you'll need to install a few things.
Please do and check these BEFORE you come to the workshop, in case the internet is slow!
If you have any questions prior to the workshop, please contact contact@onevariable.com for assistance.
Rust
You'll want to install Rust, ideally using rustup, not using your operating system's package manager.
You can follow the instructions here:
https://www.rust-lang.org/tools/install
Rust Toolchain Components
You'll want to make sure you are on the newest stable Rust version. We'll be using 1.77.2.
You can do this with:
rustup update stable
rustup default stable
You'll also want to add a couple of additional pieces:
rustup component add llvm-tools
rustup target add thumbv6m-none-eabi
probe-rs
We'll use probe-rs for debugging the board during the workshop.
You can follow the instructions here:
https://probe.rs/docs/getting-started/installation/
USB permissions
You may need to set up USB drivers or permissions for both the probe, as well as the USB device.
We recommend following the steps listed here: https://probe.rs/docs/getting-started/probe-setup/. If you've used probe-rs before, you are probably already fine.
There are also instructions listed on the nusb docs page: https://docs.rs/nusb/latest/nusb/#platform-support. You may need to add permissions rules for:
- Vendor ID: 0x16c0
- Product ID: 0x27DD
USB Cabling
The training device will require a single USB port on your computer. You will need a cable that allows you to connect to a USB-C device.
Depending on your computer, you will need either a USB A-to-C or USB C-to-C cable. We will have some spares, but please bring one if you can.
Welcome
Welcome to the workshop! This is the first stage, where we'll get familiar with the goals we have for today, and the board we'll be using.
You'll need two links today:
The link for this book
We'll be working out of this for the whole workshop
https://onevariable.com/rustnl-2024-workshop/
The link to the software repository
You'll also need this, as there's a lot of code here!
https://github.com/OneVariable/ov-twin-fw/
Goals
We have a couple of goals for today:
- Get to know our board, which has all the hardware on it that we'll need today.
- Write some software using just the board, playing with the LEDs, buttons, and sensors available
- Get our PC talking to the board
- Write some code for talking to our board and its sensors
- Write some code for streaming data to and from our sensors
- Write some custom applications
My goal is that everyone is able to learn something during the workshop. I've provided "checkpoints" in all of the exercises, so if you feel like you're running behind, you can always pick up at the next checkpoint. If you feel like you are running ahead, feel free to explore as you'd like! When in doubt, give it a try yourself before peeking at the next checkpoint, and feel free to ask me any questions, you're probably not alone!
Get to know the board
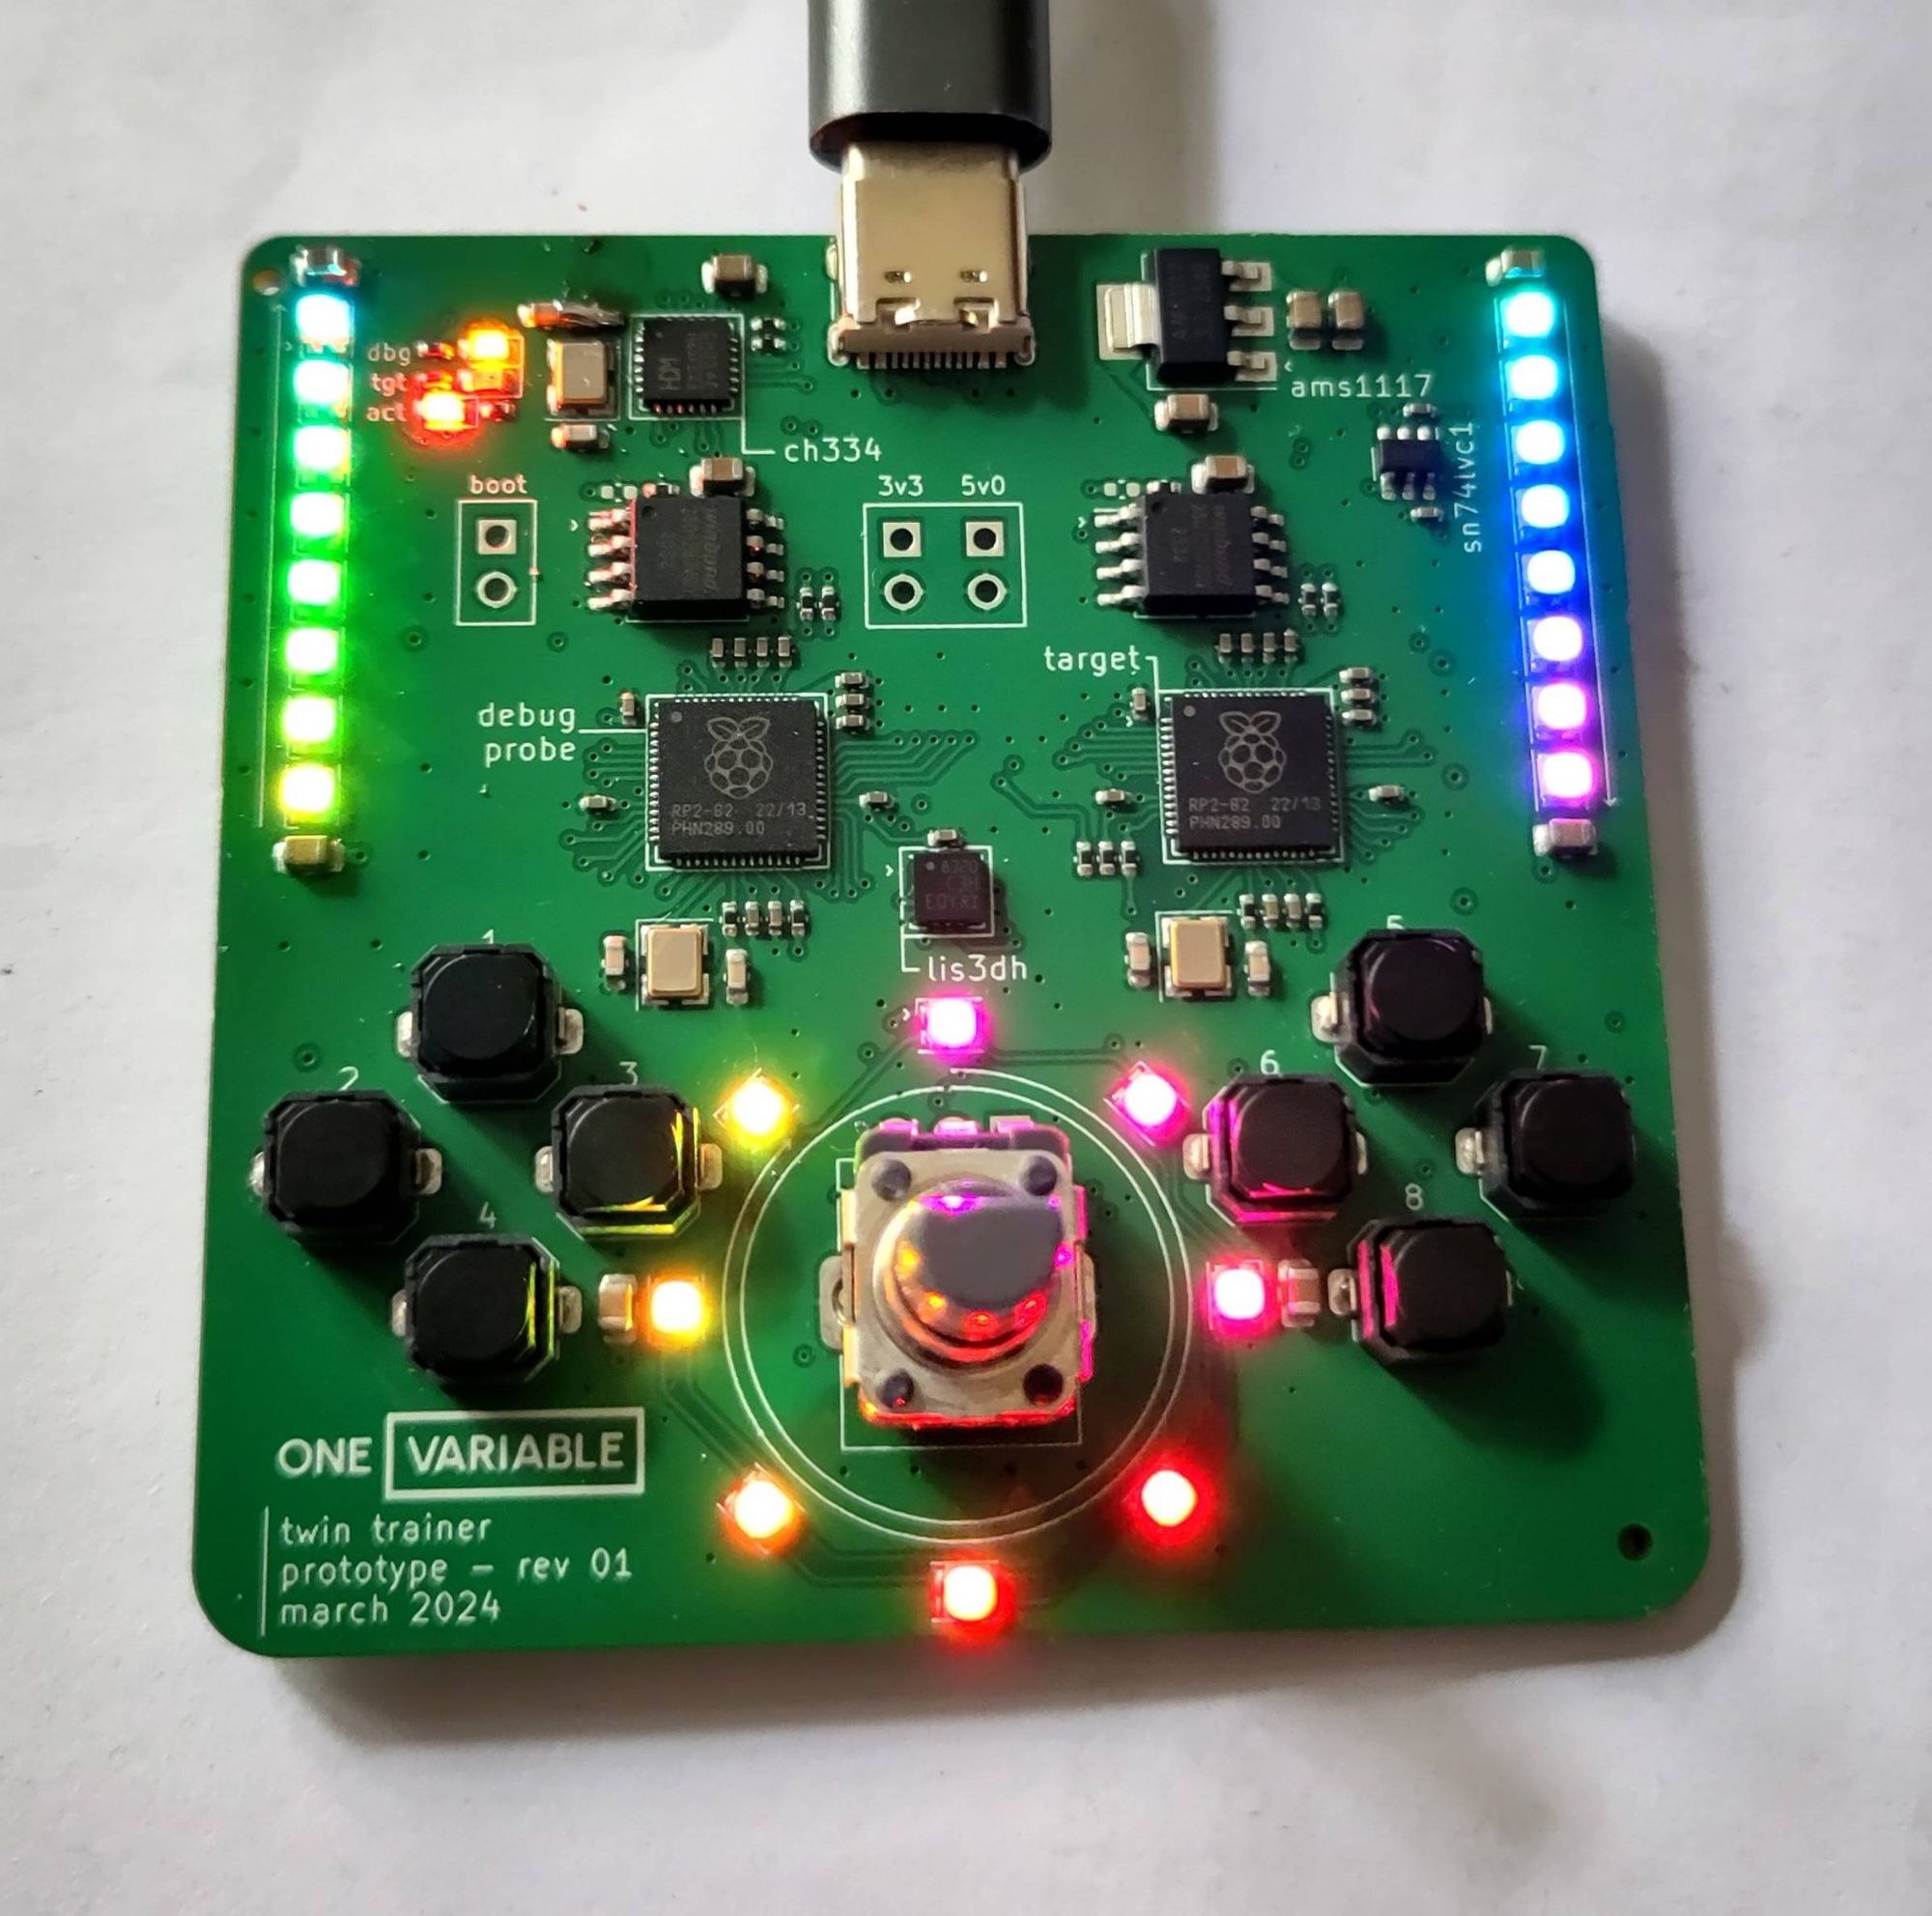
This is our board, the OneVariable Twin Trainer.
Links
You can view the KiCAD design files in the hardware repo.
You can view the schematic as a PDF here.
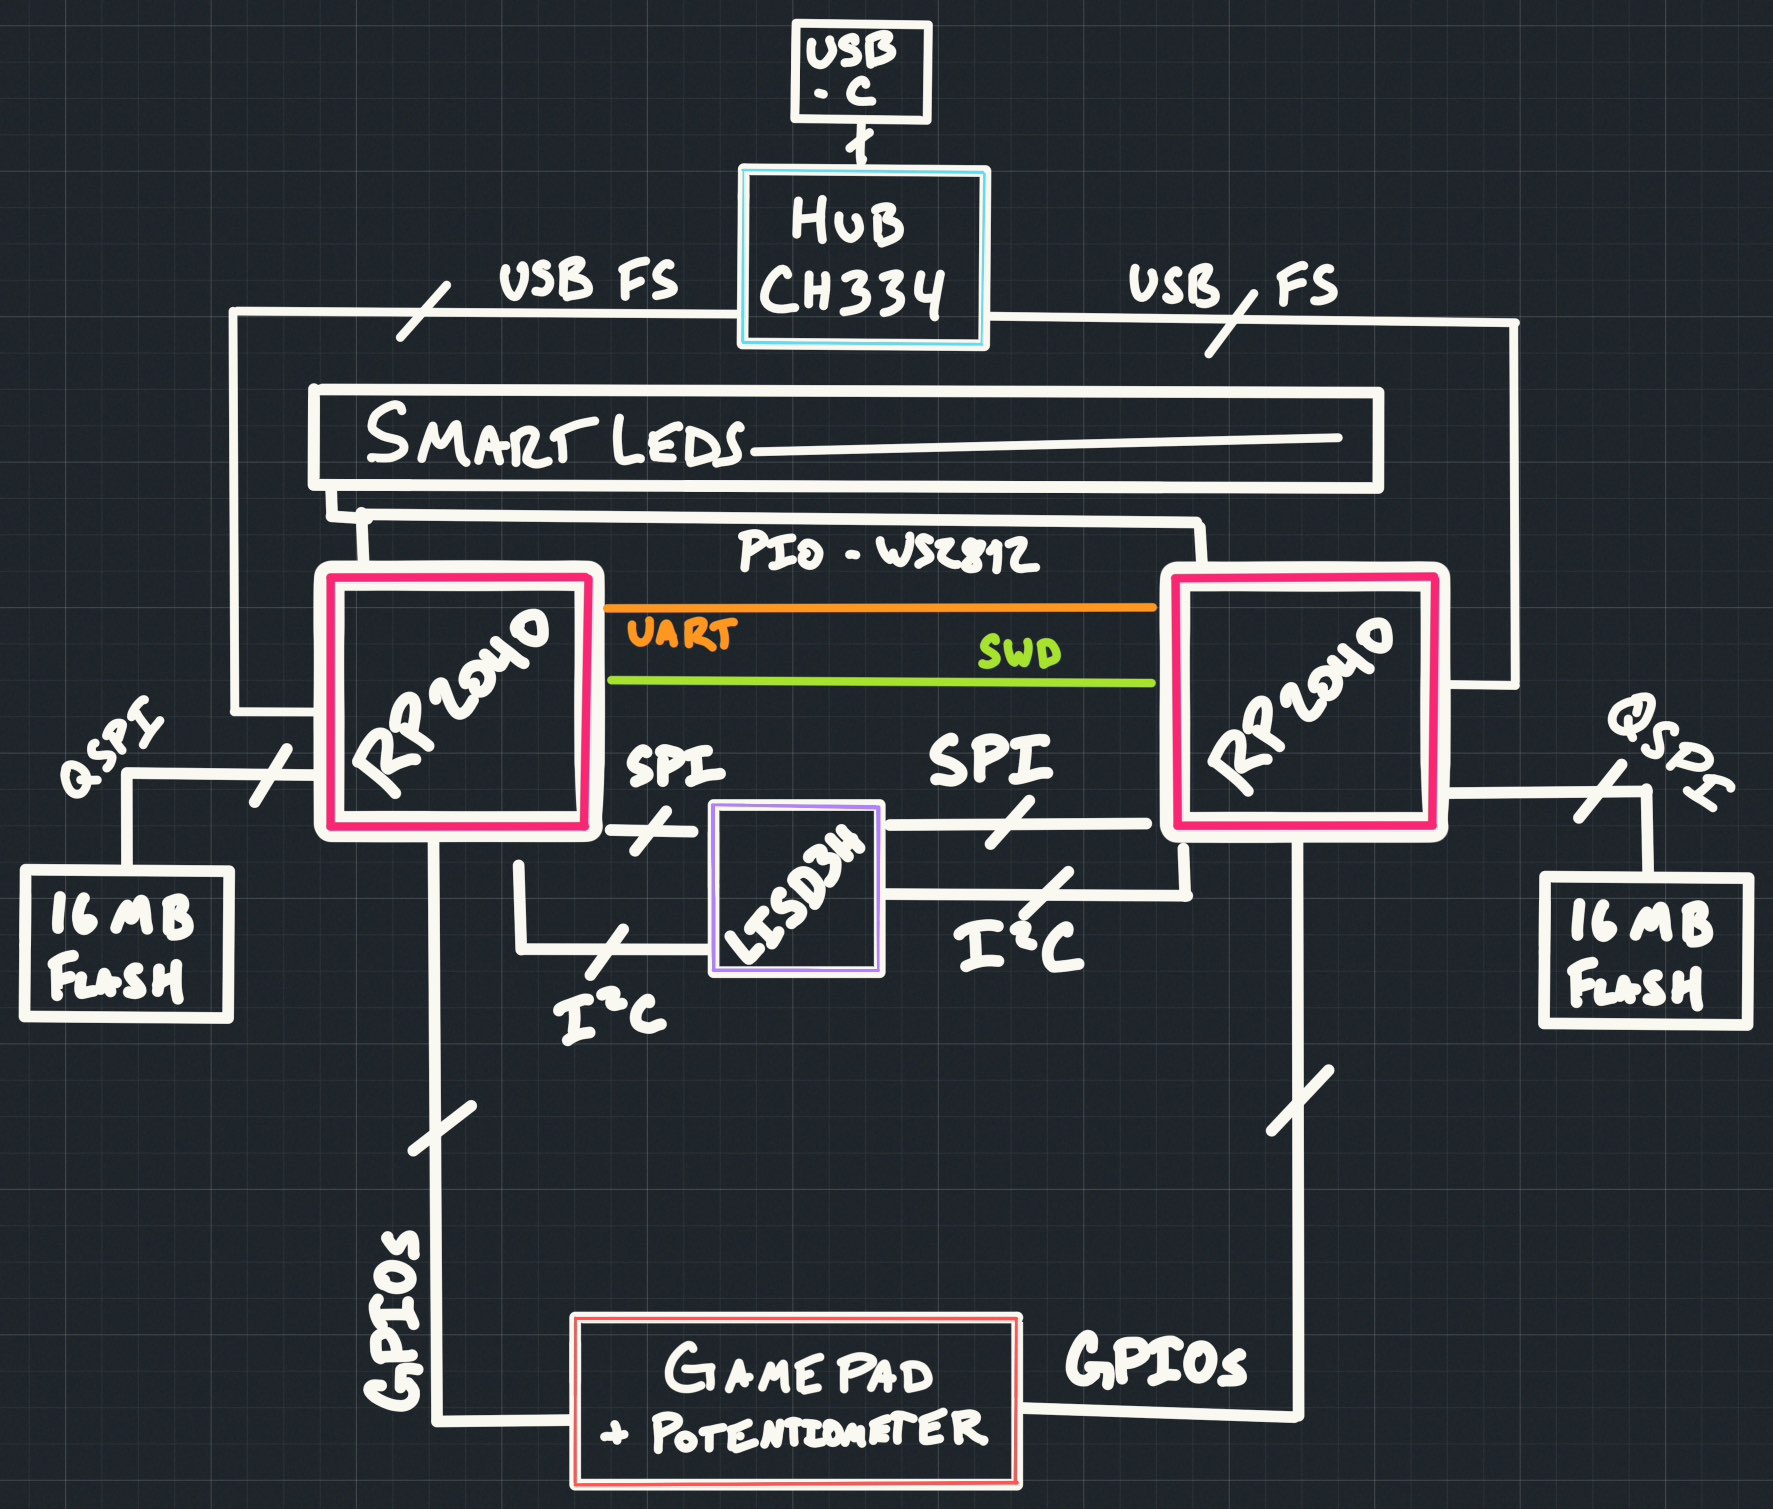
Block Diagram
Main Parts
| Part Usage | Part Number | Notes |
|---|---|---|
| Debugger | RP2040 | Using debugprobe firmware |
| Target | RP2040 | Dual Core Cortex-M0+ at 133MHz 264KiB RAM 16MiB QSPI Flash |
| USB Hub | CH334F | Allows both chips to talk through one USB port |
| Accelerometer | LIS3DH | Usable over SPI or I2C, we will use SPI |
| SmartLEDs | TX1812Z5 | Similar to WS2812B, SK6812, or "neopixels", 16M color |
| Buttons | K2-1817UQ | Square soft push buttons |
| Potentiometer | RK09D1130C3W | 10K Potentiometer, 0v0 to 3v0 |
GPIO List (target board)
| GPIO Name | Usage | Notes |
|---|---|---|
| GPIO00 | Button 1 | Button Pad (left) - active LOW |
| GPIO01 | Button 2 | Button Pad (left) - active LOW |
| GPIO02 | Button 3 | Button Pad (left) - active LOW |
| GPIO03 | Button 4 | Button Pad (left) - active LOW |
| GPIO04 | SPI MISO/CIPO | LIS3DH |
| GPIO05 | SPI CSn | LIS3DH |
| GPIO06 | SPI CLK | LIS3DH |
| GPIO07 | SPI MOSI/COPI | LIS3DH |
| GPIO08 | I2C SDA | LIS3DH (not used) |
| GPIO09 | I2C SCL | LIS3DH (not used) |
| GPIO10 | Interrupt 2 | LIS3DH (optional) - active LOW |
| GPIO11 | Interrupt 1 | LIS3DH (optional) - active LOW |
| GPIO12 | Not Used | |
| GPIO13 | Not Used | |
| GPIO14 | Not Used | |
| GPIO15 | Not Used | |
| GPIO16 | UART TX | Debugger UART |
| GPIO17 | UART RX | Debugger UART |
| GPIO18 | Button 5 | Button Pad (right) - active LOW |
| GPIO19 | Button 6 | Button Pad (right) - active LOW |
| GPIO20 | Button 7 | Button Pad (right) - active LOW |
| GPIO21 | Button 8 | Button Pad (right) - active LOW |
| GPIO22 | Not Used | |
| GPIO23 | Not Used | |
| GPIO24 | Not Used | |
| GPIO25 | Smart LED | 3v3 output |
| GPIO26 | ADC0 | Potentiometer |
| GPIO27 | Not Used | |
| GPIO28 | Not Used | |
| GPIO29 | Not Used |
Hello, ov-twin!
Cloning the repo
Let's start by cloning the project folder:
$ git clone https://github.com/OneVariable/ov-twin-fw
$ cd ov-twin-fw
All of the software we'll need for both the Host (your PC), and the Target (the RP2040) is
in the source/ folder.
Let's move to the "workbook/firmware" project. Note that this is NOT a workspace, so you may need to launch your editor here. We'll explain the other parts of the project later.
$ cd source/workbook/firmware
$ ls -lah
total 128
-rw-r--r--  1 james  staff    48K May  3 10:11 Cargo.lock
-rw-r--r--  1 james  staff   3.1K May  3 10:11 Cargo.toml
-rw-r--r--  1 james  staff   1.5K May  3 10:11 build.rs
-rw-r--r--  1 james  staff   678B May  3 10:11 memory.x
drwxr-xr-x  4 james  staff   128B May  3 10:11 src
Build a project
We'll be building a project one at a time, from the src/bin folder. You can peek ahead if you'd
like, but there might be spoilers!
We'll start by building the first project, hello-01. This may take a bit if it's your first build,
or if the internet is a little slow:
$ cargo build --release --bin hello-01
   Compiling proc-macro2 v1.0.79
   Compiling unicode-ident v1.0.12
   Compiling syn v1.0.109
   Compiling version_check v0.9.4
   Compiling defmt v0.3.6
...
   Compiling fixed-macro-types v1.2.0
   Compiling fixed-macro v1.2.0
   Compiling pio-proc v0.2.2
    Finished release [optimized + debuginfo] target(s) in 16.44s
If you got an error, make sure you followed the Setup steps, and let me know if you are stuck!
We'll now work through all of the sensors on the board, so you can see how to interact with them.
We won't focus too much on how the drivers of these sensors were written, as that's outside the scope of this workshop. Feel free to ask questions though!
SmartLEDs
Flashing the project
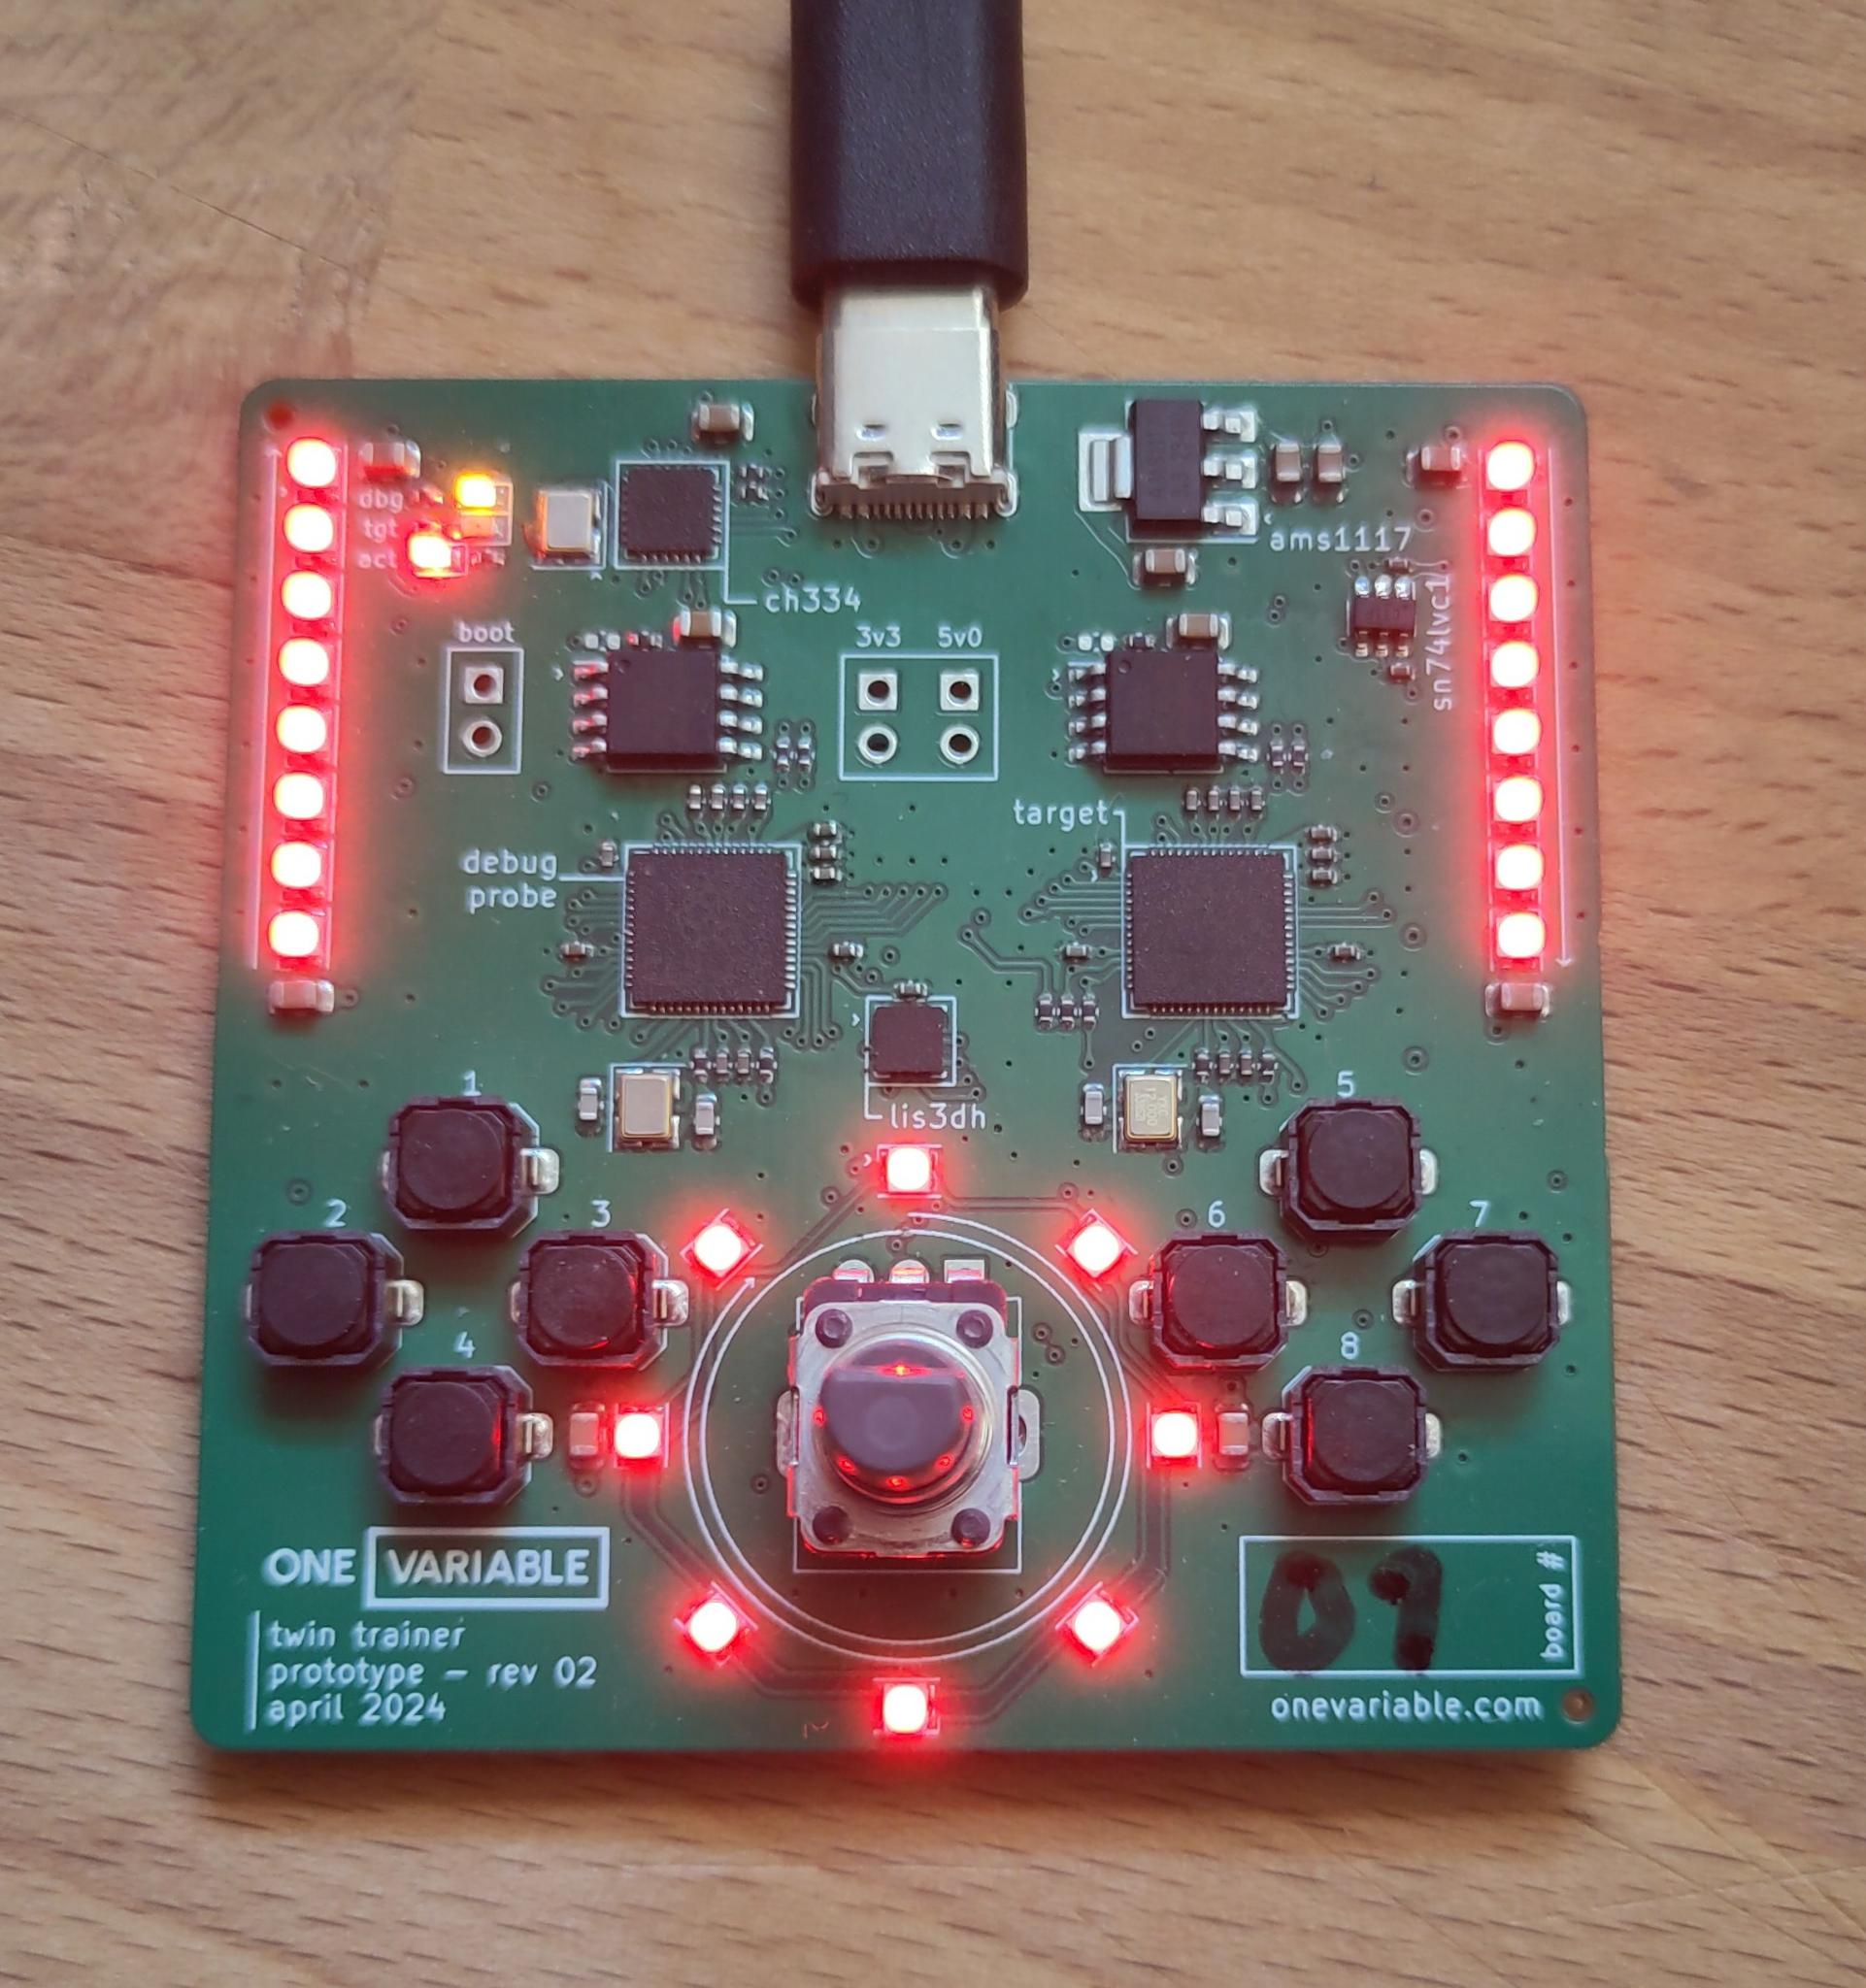
Let's go ahead and run our first program on the board. You can plug in your board to your PC.
You should see the USB lights flash briefly, then the SmartLEDs should begin pulsing a red color.
It should look like this:
Now, from the same terminal you built from, we'll go ahead and run the binary:
$ cargo run --release --bin hello-01
    Finished release [optimized + debuginfo] target(s) in 0.13s
     Running `probe-rs run --chip RP2040 --speed 12000 --protocol swd target/thumbv6m-none-eabi/release/hello-01`
      Erasing ✔ [00:00:00] [######################################################] 28.00 KiB/28.00 KiB @ 72.85 KiB/s (eta 0s )
  Programming ✔ [00:00:00] [#####################################################] 28.00 KiB/28.00 KiB @ 126.26 KiB/s (eta 0s )    Finished in 0.617s
 WARN defmt_decoder::log::format: logger format contains timestamp but no timestamp implementation was provided; consider removing the timestamp (`{t}` or `{T}`) from the logger format or provide a `defmt::timestamp!` implementation
0.000963 INFO  Start
└─ hello_01::____embassy_main_task::{async_fn#0} @ src/bin/hello-01.rs:29
0.002450 INFO  id: E4629076D3222C21
└─ hello_01::____embassy_main_task::{async_fn#0} @ src/bin/hello-01.rs:33
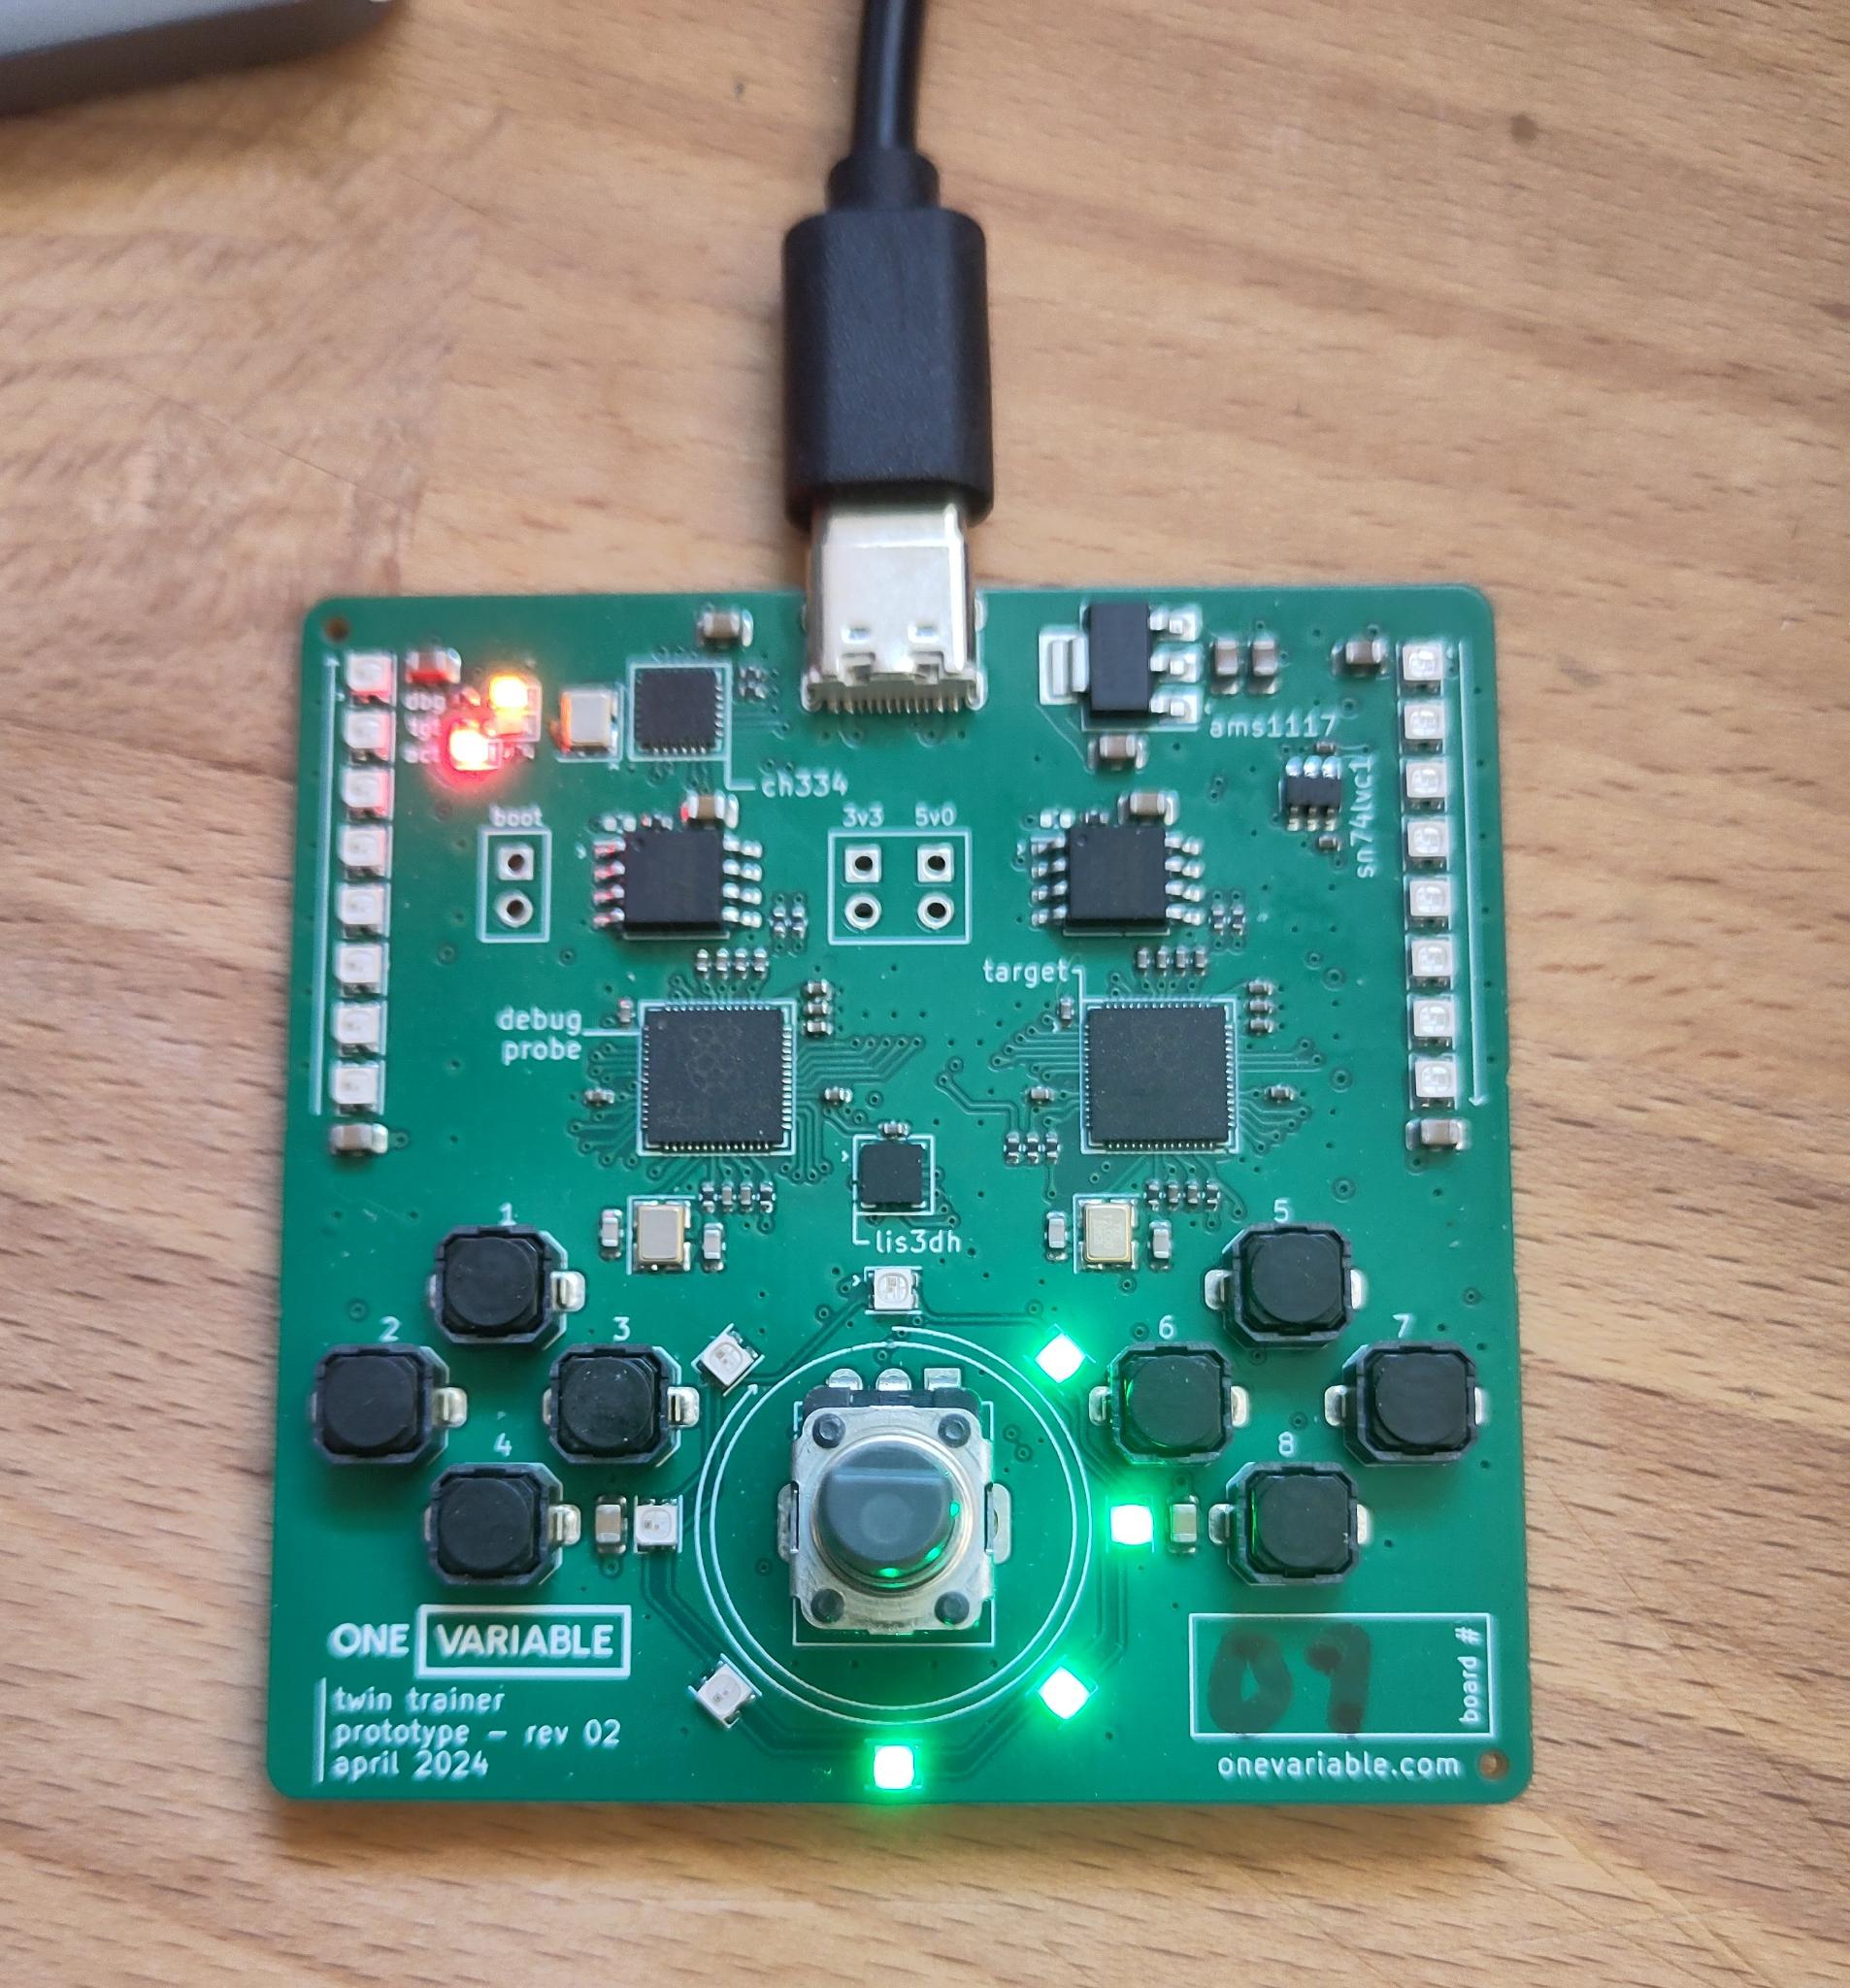
The LEDs should change to a green pattern that moves around the board. It should now look like this:
You can ignore the error that says:
WARN defmt_decoder::log::format: ...
If you got a different error, make sure you followed the Setup steps, and let me know if you are stuck!
Looking at the code
Let's look at the code in detail together, starting with the imports:
#![allow(unused)]
#![no_std]
#![no_main]

fn main() {
use defmt::info;
use embassy_executor::Spawner;
use embassy_rp::{
    peripherals::PIO0,
    pio::Pio,
};

use embassy_time::{Duration, Ticker};

use smart_leds::RGB;
use workbook_fw::{
    get_unique_id,
    ws2812::{self, Ws2812},
    NUM_SMARTLEDS,
};
}
We are using defmt for logging. This allows us to get logs over our debugging interface. You
should see the INFO logs in the firmware already.
We are also using various embassy crates to write our async firmware.
We've also provided a couple of drivers and helpers specific to our board in the workbook_fw
crate. These can be found in the src/lib.rs of our current crate.
Looking next at our main:
#[embassy_executor::main]
async fn main(spawner: Spawner) {
    // SYSTEM INIT
    info!("Start");

    let mut p = embassy_rp::init(Default::default());
    let unique_id = get_unique_id(&mut p.FLASH).unwrap();
    info!("id: {=u64:016X}", unique_id);

    // PIO/WS2812 INIT
    let Pio {
        mut common, sm0, ..
    } = Pio::new(p.PIO0, ws2812::Irqs);

    // GPIO25 is used for Smart LEDs
    let ws2812: Ws2812<'static, PIO0, 0, NUM_SMARTLEDS> =
        Ws2812::new(&mut common, sm0, p.DMA_CH0, p.PIN_25);

    // Start the LED task
    spawner.must_spawn(led_task(ws2812));
}
We have the entrypoint for the Embassy executor, and set up our WS2812 driver, used for our Smart LEDs. The SmartLEDs are connected on Pin 25 of the board.
#![allow(unused)]
fn main() {
// This is our LED task
#[embassy_executor::task]
async fn led_task(mut ws2812: Ws2812<'static, PIO0, 0, NUM_SMARTLEDS>) {
    // Tick every 100ms
    let mut ticker = Ticker::every(Duration::from_millis(100));
    let mut idx = 0;
    loop {
        // Wait for the next update time
        ticker.next().await;

        let mut colors = [colors::BLACK; NUM_SMARTLEDS];

        // A little iterator trickery to pick a moving set of four LEDs
        // to light up
        let (before, after) = colors.split_at_mut(idx);
        after
            .iter_mut()
            .chain(before.iter_mut())
            .take(4)
            .for_each(|l| {
                // The LEDs are very bright!
                *l = colors::GREEN / 16;
            });

        ws2812.write(&colors).await;
        idx += 1;
        if idx >= NUM_SMARTLEDS {
            idx = 0;
        }
    }
}
}
The ws2812.write() function takes an array of color values. Each color of Red, Green, and Blue
have a value of 0 to 255. Be careful, the LEDs are very bright! The green pattern you see
is at 1/16th brightness, don't blind yourself!
We've written some code that moves a green pattern. You can try customizing this pattern for a bit before we move on to the other parts of the code.
Buttons and Potentiometer
Running the code
We'll move on to the next project, hello-02. Let's start by running the project:
cargo run --release --bin hello-02
    Finished release [optimized + debuginfo] target(s) in 0.10s
     Running `probe-rs run --chip RP2040 --speed 12000 --protocol swd target/thumbv6m-none-eabi/release/hello-02`
      Erasing ✔ [00:00:00] [######################################################] 28.00 KiB/28.00 KiB @ 74.12 KiB/s (eta 0s )
  Programming ✔ [00:00:00] [#####################################################] 28.00 KiB/28.00 KiB @ 115.92 KiB/s (eta 0s )    Finished in 0.631s
 WARN defmt_decoder::log::format: logger format contains timestamp but no timestamp implementation was provided; consider removing the timestamp (`{t}` or `{T}`) from the logger format or provide a `defmt::timestamp!` implementation
0.000962 INFO  Start
└─ hello_02::____embassy_main_task::{async_fn#0} @ src/bin/hello-02.rs:35
0.002448 INFO  id: E4629076D3222C21
└─ hello_02::____embassy_main_task::{async_fn#0} @ src/bin/hello-02.rs:39
You can now start pressing buttons, and should see corresponding logs every time you press or release a one of the eight buttons on the board:
0.732839 INFO  Buttons changed: [false, true, false, false, false, false, false, false]
└─ hello_02::__button_task_task::{async_fn#0} @ src/bin/hello-02.rs:68
1.112836 INFO  Buttons changed: [false, false, false, false, false, false, false, false]
└─ hello_02::__button_task_task::{async_fn#0} @ src/bin/hello-02.rs:68
2.192836 INFO  Buttons changed: [true, false, false, false, false, false, false, false]
└─ hello_02::__button_task_task::{async_fn#0} @ src/bin/hello-02.rs:68
2.562838 INFO  Buttons changed: [false, false, false, false, false, false, false, false]
You'll also see the potentiometer value as you turn the dial left and right:
1.602946 INFO  Potentiometer changed: 1922
└─ hello_02::__pot_task_task::{async_fn#0} @ src/bin/hello-02.rs:86
2.702941 INFO  Potentiometer changed: 2666
└─ hello_02::__pot_task_task::{async_fn#0} @ src/bin/hello-02.rs:86
3.802943 INFO  Potentiometer changed: 4088
└─ hello_02::__pot_task_task::{async_fn#0} @ src/bin/hello-02.rs:86
5.602941 INFO  Potentiometer changed: 3149
└─ hello_02::__pot_task_task::{async_fn#0} @ src/bin/hello-02.rs:86
5.702941 INFO  Potentiometer changed: 2904
└─ hello_02::__pot_task_task::{async_fn#0} @ src/bin/hello-02.rs:86
6.402940 INFO  Potentiometer changed: 1621
└─ hello_02::__pot_task_task::{async_fn#0} @ src/bin/hello-02.rs:86
6.502941 INFO  Potentiometer changed: 1444
└─ hello_02::__pot_task_task::{async_fn#0} @ src/bin/hello-02.rs:86
7.002944 INFO  Potentiometer changed: 17
└─ hello_02::__pot_task_task::{async_fn#0} @ src/bin/hello-02.rs:86
Reading the code
We've added a little more code to main:
#![allow(unused)]
fn main() {
let buttons = Buttons::new(
    p.PIN_0, p.PIN_1, p.PIN_2, p.PIN_3, p.PIN_18, p.PIN_19, p.PIN_20, p.PIN_21,
);
let potentiometer = Potentiometer::new(p.ADC, p.PIN_26);

// Start the Button task
spawner.must_spawn(button_task(buttons));

// Start the Potentiometer task
spawner.must_spawn(pot_task(potentiometer));
}
And two new tasks:
#![allow(unused)]
fn main() {
// This is our Button task
#[embassy_executor::task]
async fn button_task(buttons: Buttons) {
    let mut last = [false; Buttons::COUNT];
    let mut ticker = Ticker::every(Duration::from_millis(10));
    loop {
        ticker.next().await;
        let now = buttons.read_all();
        if now != last {
            info!("Buttons changed: {:?}", now);
            last = now;
        }
    }
}

// This is our Potentiometer task
#[embassy_executor::task]
async fn pot_task(mut pot: Potentiometer) {
    let mut last = pot.read().await;
    let mut ticker = Ticker::every(Duration::from_millis(100));
    loop {
        ticker.next().await;
        let now = pot.read().await;
        if now.abs_diff(last) > 64 {
            info!("Potentiometer changed: {=u16}", now);
            last = now;
        }
    }
}
}
Both of these store the last state measured, so that we don't flood the logs too much.
Again, you can try to customize these a bit before moving forward.
Accelerometer
Our last sensor is a 3-axis Accelerometer. It has many more features than we'll use during the exercise, but it can read acceleration in three axis: X, Y, and Z.
It reads accleration, e.g. due to gravity, as a positive number. It can measure up to 8g of
acceleration, returning i16::MAX for 8.0g, or 4096 as 1.0g, or -4096 for -1.0g.
If the board is sitting level, it should read approximately:
- x: 0
- y: 0
- z: 4096
If you tilt the board so the potentometer is facing RIGHT, it should read approximately:
- x: 4096
- y: 0
- z: 0
If you tilt the board so the potentiometer is facing AWAY from you, it should read approximately:
- x: 0
- y: 4096
- z: 0
Running the code
We can start the code by running the hello-03 project. It will begin immediately printing out
acceleration values at 4Hz.
cargo run --release --bin hello-03
    Finished release [optimized + debuginfo] target(s) in 0.10s
     Running `probe-rs run --chip RP2040 --speed 12000 --protocol swd target/thumbv6m-none-eabi/release/hello-03`
      Erasing ✔ [00:00:00] [######################################################] 40.00 KiB/40.00 KiB @ 75.76 KiB/s (eta 0s )
  Programming ✔ [00:00:00] [#####################################################] 40.00 KiB/40.00 KiB @ 132.75 KiB/s (eta 0s )    Finished in 0.841s
 WARN defmt_decoder::log::format: logger format contains timestamp but no timestamp implementation was provided; consider removing the timestamp (`{t}` or `{T}`) from the logger format or provide a `defmt::timestamp!` implementation
0.000976 INFO  Start
└─ hello_03::____embassy_main_task::{async_fn#0} @ src/bin/hello-03.rs:38
0.002457 INFO  id: E4629076D3222C21
└─ hello_03::____embassy_main_task::{async_fn#0} @ src/bin/hello-03.rs:42
0.253936 INFO  accelerometer: AccelReading { x: -80, y: 0, z: 4064 }
└─ hello_03::__accel_task_task::{async_fn#0} @ src/bin/hello-03.rs:82
0.503916 INFO  accelerometer: AccelReading { x: -112, y: -16, z: 4048 }
└─ hello_03::__accel_task_task::{async_fn#0} @ src/bin/hello-03.rs:82
0.753916 INFO  accelerometer: AccelReading { x: -112, y: 16, z: 4048 }
└─ hello_03::__accel_task_task::{async_fn#0} @ src/bin/hello-03.rs:82
Reading the code
Similar to the other exercises, we've added some new tasks:
#![allow(unused)]
fn main() {
// in main
let accel = Accelerometer::new(
    p.SPI0, p.PIN_6, p.PIN_7, p.PIN_4, p.PIN_5, p.DMA_CH1, p.DMA_CH2,
)
.await;

// as a task
#[embassy_executor::task]
async fn accel_task(mut accel: Accelerometer) {
    let mut ticker = Ticker::every(Duration::from_millis(250));
    loop {
        ticker.next().await;
        let reading = accel.read().await;
        info!("accelerometer: {:?}", reading);
    }
}
}
One thing to note is that the constructor, Accelerometer::new() is an async function. This is
because the driver establishes the connection, and ensures we are talking to the accelerometer
using async SPI methods.
You can access the raw driver through the lis3dh-async crate.
We have also wired up the accelerometer's interrupt pins, which can serve as a "notification" when some event has happened, however we will not use that as part of the exercise today.
Establishing Comms
So far we've experimented with the board, but we want to get the host PC involved!
We'll want to talk to our device over USB. So far, we've interacted with our device like this:
So Far
            ┌─────────────┐
            │             │
            │     PC      │
            │             │
            └─────────────┘
                   ▲
                   │ USB
                   ▼
            ┌─────────────┐
            │             │
            │   USB Hub   │
            │             │
            └─────────────┘
            ▲
      ┌─USB─┘
      ▼
┌───────────┐             ┌───────────┐
│    MCU    │             │    MCU    │
│  (debug)  │─────SWD────▶│ (target)  │
└───────────┘             └───────────┘
What we Want
We'll want to enable USB on the target device, so then our diagram looks like this:
            ┌─────────────┐
            │             │
            │     PC      │
            │             │
            └─────────────┘
                   ▲
                   │ USB
                   ▼
            ┌─────────────┐
            │             │
            │   USB Hub   │
            │             │
            └─────────────┘
            ▲             ▲
      ┌─USB─┘             └─USB─┐
      ▼                         ▼
┌───────────┐             ┌───────────┐
│    MCU    │             │    MCU    │
│  (debug)  │─────SWD────▶│ (target)  │
└───────────┘             └───────────┘
Zooming in
Ignoring the USB hub and the debug MCU, we'll have something a little like this:
┌────────────┐                 ┌───────────┐
│     PC     │                 │    MCU    │
│            │◀──────USB──────▶│ (target)  │
└────────────┘                 └───────────┘
This slides over a lot of detail though! Let's look at it with a little bit more detail:
 ┌──────┐                                     ┌──────┐
┌┤  PC  ├────────────────────┐               ┌┤Target├────────────────────┐
│└──────┘                    │               │└──────┘                    │
│      Rust Application      │               │      Rust Application      │
│            Host            │◁ ─ ─ ─ ─ ─ ─ ▷│           Target           │
│                            │               │                            │
├────────────────────────────┤               ├────────────────────────────┤
│         NUSB crate         │◁ ─ ─ ─ ─ ─ ─ ▷│     embassy-usb crate      │
├────────────────────────────┤               ├────────────────────────────┤
│ Operating System + Drivers │◁ ─ ─ ─ ─ ─ ─ ▷│     embassy-rp drivers     │
├────────────────────────────┤               ├────────────────────────────┤
│        USB Hardware        │◀─────USB─────▶│        USB Hardware        │
└────────────────────────────┘               └────────────────────────────┘
Host Side
On the host side, there's a couple of main pieces. We'll have our application, which needs to
interact with devices in some way. We'll use the nusb crate, an async friendly library that
manages high level USB interactions. nusb manages the interactions with your operating system,
which in turn has drivers for your specific USB hardware.
Target Side
Conversely on the target side, things can be a little more diverse depending on the software and
hardware we are using, but in the case of Embassy on the RP2040, your application will interact
with interfaces from the embassy-usb crate which describe USB capabilities in a portable and async
way. These capabilities are provided by the USB drivers provided by the embassy-rp HAL, which
manages the low level hardware interactions.
Working Together
At each of these layers, we can conceptually think of each "part" of the PC and Target talking to each other:
- The RP2040 USB hardware talks to the PC USB hardware at a physical and electrical level
- Your operating system and drivers talk to the embassy-rp drivers, to exchange messages with each other
- The
nusbcrate talks toembassy-usbto exchange messages, such as USB "Bulk" frames - Your PC application will want to talk to the Firmware application, using some sort of protocol
If you come from a networking background, this will look very familiar to the OSI or TCP/IP model, where we have different layers with different responsibilities.
USB is a complex topic, and we won't get too deep into it! For the purposes of today's exercise, we'll focus on USB Bulk Endpoints. These work somewhat similar to "UDP Frames" from networking:
- Each device can send and receive "Bulk transfers"
- "Bulk transfers" are variable sized, and framed messages. Sort of like sending
[u8]slices to each other - Each device can send messages whenever they feel like, though the PC is "in charge", it decides when it gives messages to the device, and when it accepts messages from the device
There are many other ways that USB can work, and a lot of details we are skipping. We aren't using "standard" USB definitions, like you might use for a USB keyboard, serial ports, or a MIDI device.
Instead, we are using "raw" USB Bulk frames, like you might do if you were writing a proprietary device driver for your device.
Something to be desired
Although the stack we've looked at so far handles all of the "transport", we're lacking any sort of high level protocol! We can shove chunks of bytes back and forth, but what SHOULD we send, and when? This is a little like having a raw TCP connection, but no HTTP to "talk" at a higher level!
We'll need to define two main things:
- How to interpret our messages, e.g some kind of "wire format"
- Some sort of protocol, e.g. "how we behave" when talking to each other
Postcard
We could use any sort of wire format, like JSON or HTTP. However our microcontroller is small, and we want a protocol that will work well for both devices.
For this workshop, we'll use a format called postcard. It's a compact binary format, built on
top of the serde crate. It supports all Rust types, including primitives, structs, and enums.
We can define a type like this:
#![allow(unused)]
fn main() {
#[derive(Serialize, Deserialize)]
pub struct AccelReading {
    pub x: i16,
    pub y: i16,
    pub z: i16,
}
}
If we were to serialize a value like this:
#![allow(unused)]
fn main() {
AccelReading { x: 63, y: -1, z: -32768 }
}
We'd end up with a value like this:
#![allow(unused)]
fn main() {
[
    0x7E,             // 63
    0x01,             // -1
    0xFF, 0xFF, 0x03, // -32768
]
}
We don't have to worry exactly WHY it looks like this, though you could look at the postcard specification if you wanted, but the main take aways are:
- This is a "non self describing format": The messages don't describe the type at all, only the values. This means we send less data on the wire, but both sides have to understand what data they are looking at.
- The message is fairly compact, it only takes us 5 bytes to send data that takes 6 bytes in memory
Since postcard works on both desktop and no_std targets, we don't need to do anything extra
to define how to turn Rust data types into bytes, and how to turn bytes into data types.
Still something missing
We could go off running, just sending postcard encoded data back and forth over USB, but there's two problems we'll run into quickly:
- We probably will want to send different KINDS of messages. How does each device tell each other what type of message this is, and how to interpret them?
- How do we define how each side behaves? How can one device request something from the other, and know how to interpret that response?
At the end of the day, postcard is just an encoding, not a protocol. You could build something
on top of postcard to describe a protocol, and that's what postcard-rpc is!
postcard-rpc
postcard-rpc is a fairly new crate that captures a lot of the "manual" or "bespoke" protocols I've
built on top of postcard over the past years.
First, let me define some concepts, as they are used by postcard-rpc:
RPC, or Remote Procedure Call
RPC is a pattern for communication, often over a network, where one device wants another device to do something. This "something" can be storing data we provide, retrieving some data, or doing some more complicated operation.
This has a typical interaction pattern:
- The first device makes a Request to the second device
- The second device processes that Request, and sends a Response
With our microcontroller, this might look a little like this:
PC ---Request--> MCU
                 ...
PC <--Response-- MCU
The reason this is called a "Remote Procedure Call" is because conceptually, we want this to "feel like" a normal function call, and ignore the network entirely, and instead look like:
#![allow(unused)]

fn main() {
async fn procedure(Request) -> Response {
    // ...
}

}
Conceptually, this is similar to things like a REST request over the network, a GET or PUT request might transfer data, or trigger some more complex operation.
Endpoints
For any given kind of RPC, there will be a pair of Request and Response types that go with each
other. If the MCU could respond with one of a few kinds of responses, we can use an enum to
capture all of those.
But remember, we probably want to have multiple kinds of requests and responses that we support!
For that, we can define multiple Endpoints, where each Endpoint refers to a single pair of
request and response types. We also want to add in a little unique information per endpoint, in
case we want to use the same types for multiple endpoints.
We might define an Endpoint in postcard-rpc like this:
#![allow(unused)]

fn main() {
#[derive(Debug, PartialEq, Serialize, Deserialize, Schema)]
pub struct Sleep {
    pub seconds: u32,
    pub micros: u32,
}

#[derive(Debug, PartialEq, Serialize, Deserialize, Schema)]
pub struct SleepDone {
    pub slept_for: Sleep,
}

endpoint!(
    SleepEndpoint,  // This is the NAME of the Endpoint
    Sleep,          // This is the Request type
    SleepDone,      // This is the Response type
    "sleep"         // This is the "path" of the endpoint
);


}
These endpoints will be defined in some shared library crate between our MCU and our PC.
Unsolicited messages
Although many problems can be solved using a Request/Response pattern, it is also common to send "unsolicited" messages. Two common cases are "streaming" and "notifications".
"Streaming" is relevant when you are sending a LOT of messages, for example sending continuous sensor readings, and where making one request for every response would add a lot of overhead.
"Notifications" are relevant when you are RARELY sending messages, but don't want to constantly "poll" for a result.
Topics
postcard-rpc also allows for this in either direction, referred to as Topics. The name Topic
is inspired by MQTT, which is used for publish and subscribe (or "pubsub") style data transfers.
We might define a Topic in postcard-rpc like this:
#![allow(unused)]
fn main() {
#[derive(Debug, PartialEq, Serialize, Deserialize, Schema)]
pub struct AccelReading {
    pub x: i16,
    pub y: i16,
    pub z: i16,
}

topic!(
    AccelTopic,     // This is the NAME of the Topic
    AccelReading,   // This is the Topic type
    "acceleration", // This is the "path" of the topic
);
}
postcard-rpc Messages
Now that we have our three kinds of messages:
- Endpoint Requests
- Endpoint Responses
- Topic Messages
How does postcard-rpc help us determine which is which?
At the front of every message, we add a header with two fields:
- a Key, explained below
- a Sequence Number (a
u32)
Keys
Since postcard doesn't describe the types of the messages that it is sending, and we don't want
to send a lot of extra data for every message, AND we don't want to manually define all the
different unique IDs for every message kind, instead postcard-rpc automatically and
deterministically generates IDs using two pieces of information:
- The Schema of the message type
- The "path" string of the endpoint
So from our examples before:
SleepEndpoint::Request::Key  = hash("sleep") + hash(schema(Sleep));
SleepEndpoint::Response::Key = hash("sleep") + hash(schema(SleepDone));
AccelTopic::Message::Key     = hash("acceleration") + hash(schema(AccelReading));
As of now, keys boil down to an 8-byte value, calculated at compile time as a constant.
This is important for two reasons:
- It gives us a "unique" ID for every kind of request and response
- If the contents of the request or response changes, so does the key! This means that we never have to worry about the issue of one of the devices changing a message's type, and misinterpreting the data (though it means we can't 'partially understand' messages that have changed in a small way).
Sequence Numbers
Since we might have multiple requests "In Flight" at one time, we use an incrementing sequence number to each request. This lets us tell which response goes with each request, even if they arrive out of order.
For example:
PC ---Request 1-->-----.       MCU
   ---Request 2-->-----|--.
   ---Request 3-->--.  |  |
                    |  |  |
   <--Response 3----'  |  |
   <--Response 1-------'  |
   <--Response 2----------'
Even though our responses come back in a different order, we can still tell which responses went with each request.
Putting it all together
We've now added one "logical" layer to our stack, the postcard-rpc protocol!
Remember our old diagram:
 ┌──────┐                                     ┌──────┐
┌┤  PC  ├────────────────────┐               ┌┤Target├────────────────────┐
│└──────┘                    │               │└──────┘                    │
│      Rust Application      │               │      Rust Application      │
│            Host            │◁ ─ ─ ─ ─ ─ ─ ▷│           Target           │
│                            │               │                            │
├────────────────────────────┤               ├────────────────────────────┤
│         NUSB crate         │◁ ─ ─ ─ ─ ─ ─ ▷│     embassy-usb crate      │
├────────────────────────────┤               ├────────────────────────────┤
│ Operating System + Drivers │◁ ─ ─ ─ ─ ─ ─ ▷│     embassy-rp drivers     │
├────────────────────────────┤               ├────────────────────────────┤
│        USB Hardware        │◀─────USB─────▶│        USB Hardware        │
└────────────────────────────┘               └────────────────────────────┘
Now it looks something like this:
 ┌──────┐                                     ┌──────┐
┌┤  PC  ├────────────────────┐               ┌┤Target├────────────────────┐
│└──────┘                    │               │└──────┘                    │
│      Rust Application      │               │      Rust Application      │
│            Host            │◁ ─ ─ ─ ─ ─ ─ ▷│           Target           │
│                            │               │                            │
├────────────────────────────┤               ├────────────────────────────┤
│  postcard-rpc host client  │◁ ─ ─ ─ ─ ─ ─ ▷│ postcard-rpc target server │
├────────────────────────────┤               ├────────────────────────────┤
│         NUSB crate         │◁ ─ ─ ─ ─ ─ ─ ▷│     embassy-usb crate      │
├────────────────────────────┤               ├────────────────────────────┤
│ Operating System + Drivers │◁ ─ ─ ─ ─ ─ ─ ▷│     embassy-rp drivers     │
├────────────────────────────┤               ├────────────────────────────┤
│        USB Hardware        │◀─────USB─────▶│        USB Hardware        │
└────────────────────────────┘               └────────────────────────────┘
That's enough theory for now, let's start applying it to our firmware to get messages back and forth!
Interacting with the board
We'll need to zoom out and look at three different crates in our workbook folder:
firmware- our MCU firmware that we've been working on so farworkbook-host- A crate for running on our PCworkbook-icd- A crate for our protocol's type,Endpoints, andTopics
Let's look at the "ICD" crate first!
Interface Control Document
An Interface Control Document, or ICD, is a systems engineering term for the definition of an interface for some kind of system.
In our system, it defines the "project specific" bits of how our two systems will talk to
each other. To start off, there's not much in our workshop-icd project. We define a single
postcard_rpc::Endpoint, as we read about in the previous section:
#![allow(unused)]
fn main() {
endpoint!(PingEndpoint, u32, u32, "ping");
}
This declares an endpoint, PingEndpoint, that takes a u32 as a Request, a u32 as a Response,
and a path of "ping".
Next, let's look at our next firmware project, comms-01.
Back to the firmware
We can now take a look at the comms-01 project, in the firmware folder.
We've taken away most of the driver code, and replaced it with the code we need to set up our
RP2040's postcard-rpc setup.
Setup and Run
In our main, we've added this code:
#![allow(unused)]
fn main() {
let driver = usb::Driver::new(p.USB, Irqs);
let mut config = example_config();
config.manufacturer = Some("OneVariable");
config.product = Some("ov-twin");
let buffers = ALL_BUFFERS.take();
let (device, ep_in, ep_out) = configure_usb(driver, &mut buffers.usb_device, config);
let dispatch = Dispatcher::new(&mut buffers.tx_buf, ep_in, Context {});

spawner.must_spawn(dispatch_task(ep_out, dispatch, &mut buffers.rx_buf));
spawner.must_spawn(usb_task(device));
}
Let's break this down piece by piece:
#![allow(unused)]
fn main() {
let driver = usb::Driver::new(p.USB, Irqs);
}
This line is straight out of embassy-rp, it just sets up the hardware and interrupt handlers
needed to manage the USB hardware at a low level. You would do this for any embassy-rp project
using USB.
Next up, we handle some configuration:
#![allow(unused)]
fn main() {
let mut config = example_config();
config.manufacturer = Some("OneVariable");
config.product = Some("ov-twin");
}
example_config() is a function from the postcard_rpc::target_server module. This takes the
configuration structure provided by embassy-usb, and customizes it in a standard way. This
looks like this:
#![allow(unused)]
fn main() {
pub fn example_config() -> embassy_usb::Config<'static> {
    // Create embassy-usb Config
    let mut config = embassy_usb::Config::new(0x16c0, 0x27DD);
    config.manufacturer = Some("Embassy");
    config.product = Some("USB example");
    config.serial_number = Some("12345678");

    // Required for windows compatibility.
    // https://developer.nordicsemi.com/nRF_Connect_SDK/doc/1.9.1/kconfig/CONFIG_CDC_ACM_IAD.html#help
    config.device_class = 0xEF;
    config.device_sub_class = 0x02;
    config.device_protocol = 0x01;
    config.composite_with_iads = true;

    config
}
}
We then overwrite the manufacturer and product fields to something specific for our exercise.
Then, we continue configuring the RP2040's USB hardware:
#![allow(unused)]
fn main() {
let buffers = ALL_BUFFERS.take();
let (device, ep_in, ep_out) = configure_usb(driver, &mut buffers.usb_device, config);
let dispatch = Dispatcher::new(&mut buffers.tx_buf, ep_in, Context {});
}
These lines do three things:
- We take some static data buffers that
postcard_rpcneeds for USB communication, as well as for serializing and deserializing messages. configure_usb, a function frompostcard_rpc::target_serverconfigures the USB:- It applies the
configthat we just prepared - It configures the low level drivers using the
embassy-usbinterfaces - It gives us back three things:
- the
device, which is a task that needs to be run to maintain the low level USB driver pieces ep_in, our USB "Bulk Endpoint", in the In (to the PC) directionep_out, our USB "Bulk Endpoint", in the Out (to the MCU) direction
- the
- It applies the
- We set up a
Dispatcher(more on this below), giving it the buffers, theep_in, and a struct calledContext
Then, we spawn two tasks:
#![allow(unused)]
fn main() {
spawner.must_spawn(dispatch_task(ep_out, dispatch, &mut buffers.rx_buf));
spawner.must_spawn(usb_task(device));
}
Which look like this, basically "just go run forever":
#![allow(unused)]
fn main() {
/// This actually runs the dispatcher
#[embassy_executor::task]
async fn dispatch_task(
    ep_out: Endpoint<'static, USB, Out>,
    dispatch: Dispatcher,
    rx_buf: &'static mut [u8],
) {
    rpc_dispatch(ep_out, dispatch, rx_buf).await;
}

/// This handles the low level USB management
#[embassy_executor::task]
pub async fn usb_task(mut usb: UsbDevice<'static, Driver<'static, USB>>) {
    usb.run().await;
}
}
Hopefully, this all makes sense covering the "setup" and "run" parts of getting the postcard-rpc stack going:
- We setup the low level hardware, from the
embassy-rpdrivers - We have a helper function that configures the
embassy-usbcomponents - We hand those pieces to something from
postcard-rpc, that uses theembassy-usbcomponents
Let's scroll back up to the top of the firmware and see what we skipped:
Defining our protocol
At the top of comms-01, there's some interesting looking code:
#![allow(unused)]
fn main() {
static ALL_BUFFERS: ConstInitCell<AllBuffers<256, 256, 256>> =
    ConstInitCell::new(AllBuffers::new());

pub struct Context {}

define_dispatch! {
    dispatcher: Dispatcher<
        Mutex = ThreadModeRawMutex,
        Driver = usb::Driver<'static, USB>,
        Context = Context
    >;
    PingEndpoint => blocking ping_handler,
}
}
The first part with ALL_BUFFERS we've explained a bit: we're using the ConstInitCell from
the static_cell crate to create a "single use" set of buffers that have static lifetime.
The three 256 values are the size in bytes we give for various parts of the USB and postcard-rpc
stack.
We then define a struct called Context with no fields. We'll look into this more soon!
Finally, we call a slightly weird macro called define_dispatch!. This comes from the
postcard-rpc crate, and we'll break that down a bit.
#![allow(unused)]
fn main() {
dispatcher: Dispatcher<
    Mutex = ThreadModeRawMutex,
    Driver = usb::Driver<'static, USB>,
    Context = Context
>;
}
First, since postcard-rpc can work with ANY device that works with embassy-usb, we need to
define which types we are using, so the macro can create a Dispatcher type for us. The
dispatcher has a couple of responsibilities:
- When we RECEIVE a Request, it figures out what kind of message it is, and passes that message on to a handler, if it knows about that kind of Request.
- If we pass on the message to the handler, we need to deserialize the message, so that the handler doesn't need to manage that
- When that handler completes, it will return a Response. The Dispatcher will then serialize that response, and send it back over USB.
- If an error ever occurs, for example if we ever got a message kind we don't understand, or if deserialization failed due to message corruption, the dispatcher will automatically send back an error response.
NOTE: this macro looks like it's using "associated type" syntax, but it's not really, it's just macro syntax, so don't read too much into it!
How does this Dispatcher know all the kinds of messages it needs to handle? That's what the next
part is for:
#![allow(unused)]
fn main() {
PingEndpoint => blocking ping_handler,
}
This is saying:
- Whenever we get a message on the
PingEndpoint - Decode it, and pass it to the
blockingfunction calledping_handler
If we look lower in our code, we'll find a function that looks like this:
#![allow(unused)]
fn main() {
fn ping_handler(_context: &mut Context, header: WireHeader, rqst: u32) -> u32 {
    info!("ping: seq - {=u32}", header.seq_no);
    rqst
}
}
This handler will be called whenever we receive a PingEndpoint request. All postcard-rpc
take these three arguments:
- A
&mutreference to theContexttype we defined indefine_dispatch, you can put anything you like in thisContexttype! - The
headerof the request, this includes the Key and sequence number of the request - The
rqst, which will be whatever theRequesttype of thisEndpointis
This function also returns exactly one thing: whatever the Response type of this endpoint.
We can see that our ping_handler will return whatever value it received without modification, and
log the sequence number that we saw.
And that's all that's necessary on the firmware side!
Host side
In workbook-host/src/client.rs, there's two important parts we need to look at:
#![allow(unused)]
fn main() {
impl WorkbookClient {
    pub fn new() -> Self {
        let client =
            HostClient::new_raw_nusb(|d| d.product_string() == Some("ov-twin"), ERROR_PATH, 8);
        Self { client }
    }
// ...
}
}
postcard-rpc provides a HostClient struct that handles the PC side of communication.
Here, we tell it that we want to use the "raw_nusb" transport, which takes a closure it uses to find the relevant USB device we want to connect to. Here, we just look for the first device with a product string of "ov-twin", which we configured in the firmware. You might need something smarter if you expect to have more than one device attached at a time!
HostClient allows for custom paths for errors, and allows you to configure the number of
"in flight" requests at once. We don't need to worry about those for now.
We then have a method called ping:
#![allow(unused)]
fn main() {
pub async fn ping(&self, id: u32) -> Result<u32, WorkbookError<Infallible>> {
    let val = self.client.send_resp::<PingEndpoint>(&id).await?;
    Ok(val)
}
}
The main method here is HostClient::send_resp, which takes the Endpoint as a generic argument,
which lets it know that it should take Request as an argument, and will return Result<u32, ...>.
The Err part of the Result is a little tricky, but this comes from the fact that errors can come
from three different "layers":
- A USB error, e.g. if the USB device disconnects or crashes
- A
postcard-rpc"transport" error, e.g. if the device replies "I don't know that Endpoint". - (optional) if the Response type is
Result<T, E>, we can "flatten" that error so that if we receive a message, but it's anErr, we can return that error. See theFlattenErrtrait for how we do this.
Finally, in workbook-host/src/bin/comms-01.rs, we have a binary that uses this client:
#[tokio::main]
pub async fn main() {
    let client = WorkbookClient::new();
    let mut ticker = interval(Duration::from_millis(250));

    for i in 0..10 {
        ticker.tick().await;
        print!("Pinging with {i}... ");
        let res = client.ping(i).await.unwrap();
        println!("got {res}!");
        assert_eq!(res, i);
    }
}
Give it a try!
In your firmware terminal, run cargo run --release --bin comms-01, and in your host terminal,
run cargo run --release --bin comms-01 as well.
On the host side, you should see:
$ cargo run --release --bin comms-01
   Compiling workbook-host-client v0.1.0 (/Users/james/onevariable/ovtwin-fw/source/workbook/workbook-host)
    Finished release [optimized] target(s) in 0.33s
     Running `target/release/comms-01`
Pinging with 0... got 0!
Pinging with 1... got 1!
Pinging with 2... got 2!
Pinging with 3... got 3!
Pinging with 4... got 4!
Pinging with 5... got 5!
Pinging with 6... got 6!
Pinging with 7... got 7!
Pinging with 8... got 8!
Pinging with 9... got 9!
On the target side, you should see:
$ cargo run --release --bin comms-01
    Finished release [optimized + debuginfo] target(s) in 0.09s
     Running `probe-rs run --chip RP2040 --speed 12000 --protocol swd target/thumbv6m-none-eabi/release/comms-01`
      Erasing ✔ [00:00:00] [######################################################] 44.00 KiB/44.00 KiB @ 75.88 KiB/s (eta 0s )
  Programming ✔ [00:00:00] [#####################################################] 44.00 KiB/44.00 KiB @ 126.11 KiB/s (eta 0s )    Finished in 0.94s
 WARN defmt_decoder::log::format: logger format contains timestamp but no timestamp implementation was provided; consider removing the timestamp (`{t}` or `{T}`) from the logger format or provide a `defmt::timestamp!` implementation
0.000985 INFO  Start
└─ comms_01::____embassy_main_task::{async_fn#0} @ src/bin/comms-01.rs:41
0.002458 INFO  id: E4629076D3222C21
└─ comms_01::____embassy_main_task::{async_fn#0} @ src/bin/comms-01.rs:45
0.003023 INFO  USB: config_descriptor used: 40
└─ embassy_usb::builder::{impl#1}::build @ /Users/james/.cargo/git/checkouts/embassy-69e86c528471812c/0d0d8e1/embassy-usb/src/fmt.rs:143
0.003057 INFO  USB: bos_descriptor used: 40
└─ embassy_usb::builder::{impl#1}::build @ /Users/james/.cargo/git/checkouts/embassy-69e86c528471812c/0d0d8e1/embassy-usb/src/fmt.rs:143
0.003081 INFO  USB: msos_descriptor used: 162
└─ embassy_usb::builder::{impl#1}::build @ /Users/james/.cargo/git/checkouts/embassy-69e86c528471812c/0d0d8e1/embassy-usb/src/fmt.rs:143
0.003106 INFO  USB: control_buf size: 64
└─ embassy_usb::builder::{impl#1}::build @ /Users/james/.cargo/git/checkouts/embassy-69e86c528471812c/0d0d8e1/embassy-usb/src/fmt.rs:143
0.444093 DEBUG SET_CONFIGURATION: configured
└─ embassy_usb::{impl#2}::handle_control_out @ /Users/james/.cargo/git/checkouts/embassy-69e86c528471812c/0d0d8e1/embassy-usb/src/fmt.rs:130
260.649991 INFO  ping: seq - 0
└─ comms_01::ping_handler @ src/bin/comms-01.rs:77
260.904715 INFO  ping: seq - 1
└─ comms_01::ping_handler @ src/bin/comms-01.rs:77
261.154425 INFO  ping: seq - 2
└─ comms_01::ping_handler @ src/bin/comms-01.rs:77
261.405078 INFO  ping: seq - 3
└─ comms_01::ping_handler @ src/bin/comms-01.rs:77
261.651749 INFO  ping: seq - 4
└─ comms_01::ping_handler @ src/bin/comms-01.rs:77
261.900945 INFO  ping: seq - 5
└─ comms_01::ping_handler @ src/bin/comms-01.rs:77
262.154443 INFO  ping: seq - 6
└─ comms_01::ping_handler @ src/bin/comms-01.rs:77
262.405163 INFO  ping: seq - 7
└─ comms_01::ping_handler @ src/bin/comms-01.rs:77
262.653731 INFO  ping: seq - 8
└─ comms_01::ping_handler @ src/bin/comms-01.rs:77
262.902596 INFO  ping: seq - 9
└─ comms_01::ping_handler @ src/bin/comms-01.rs:77
Hooray! We have internection!
Endpoints
We're now entering the more "self directed" part of the workshop! Feel free to ask as many questions as you'd like, or build the things YOU want to!
A great place to start is by building various endpoints for the different sensors on the board.
For now we'll only focus on Endpoints and address Topics later, but feel free to go ahead if you'd like!
Some questions to think about include:
- What kind of endpoints, or logical requests make sense for the different parts of the board?
- What kind of data makes sense for a request? Not all requests need to include data!
- What kind of data makes sense for a response? Not all responses need to include data!
- When should we use built in types, like
boolori32, and when would it make sense to define our own types? - Should our endpoints use blocking handlers? async handlers?
Don't forget, we have lots of parts on our board, and example code for interacting with:
- Buttons
- Potentiometer Dial
- RGB LEDs
- Accelerometer (X, Y, Z)
Host side
You can definitely start with a basic "demo" app that just makes one kind of request, or sends request every N milliseconds, X times.
One easy way to make an interactive program is by making a "REPL", or a "Read, Evaluate, Print, Loop" program. An easy way to do this is using a structure like this:
#[tokio::main]
async fn main() {
    // Begin repl...
    loop {
        print!("> ");
        stdout().flush().unwrap();
        let line = read_line().await;
        let parts: Vec<&str> = line.split_whitespace().collect();
        match parts.as_slice() {
            ["ping"] => {
                let ping = client.ping(42).await.unwrap();
                println!("Got: {ping}.");
            }
            ["ping", n] => {
                let Ok(idx) = n.parse::<u32>() else {
                    println!("Bad u32: '{n}'");
                    continue;
                };
                let ping = client.ping(idx).await.unwrap();
                println!("Got: {ping}.");
            }
            other => {
                println!("Error, didn't understand '{other:?};");
            }
        }
    }
}

async fn read_line() -> String {
    tokio::task::spawn_blocking(|| {
        let mut line = String::new();
        std::io::stdin().read_line(&mut line).unwrap();
        line
    })
    .await
    .unwrap()
}
You can very quickly build something that feels like a scripting interface, and is usually very natural feeling for tech-oriented users. These tend to be VERY valuable tools to have when doing board bringup, or even early factory testing!
Of course, you could also make a command line interface using a crate like clap, or even a GUI
application if you know how to already!
Streaming with Topics
Topics are useful for cases when you either want to send a LOT of data, e.g. streaming raw sensor
values, or cases where you want to rarely send notifications that some event has happened.
Always Sending
One way you can use Topics is to just always send data, even unprompted. For example, you could periodically send information like "uptime", or how many milliseconds since the software has started. For more complex projects, you could include other performance counters, CPU Load, or memory usage over time.
You'll need to store the time that the program started (check out Instant from embassy-time!),
and make a task OUTSIDE the dispatcher to do this. Don't forget that the Dispatcher struct has
the sender as a field, and it has a a method called publish() you can use with
sender.publish::<YourTopic>(&your_msg).await.
Start/Stop sending
You can also pair starting and stopping a stream on a Topic by using an endpoint. You could use
a spawn handler to begin streaming, and use a blocking or async task to signal the task to
stop.
You may need to share some kind of signal, embassy-sync has useful data structures you can use
in the Context struct, or as a static.
Consider setting up some kind of streaming endpoint for the accelerometer using Topics.
Some things to keep in mind:
- How should the host provide the "configuration" values for the stream, like the frequency of sampling?
- What to do if an error occurs, and we need to stop the stream without the host asking?
- What to do if the host asks the target to stop, but it had never started?
Custom Applications
So far, we've mostly treated our firmware as an entity that ONLY behaves on requests from the client. However, most real world firmware tends to be doing something normally, and the data connection is only one part of influencing that behavior.
Consider building some type of application or game you could play WITHOUT sending commands from your PC, like a guessing game, a visualizer of the potentiometer or accelerometer data, or something else that allows the user to interact with the board, while still streaming information, or accepting commands that change some configuration or behavior at runtime.
This part of the exercise is totally open ended, and please feel free to ask as many questions as you'd like! I can't wait to see what you build!
Thank you for participating in this workshop.
I hope to hear from you all in the future!
James Munns